Documentation for TAMPERLOGS
Setting up integrations, SSO, and everything else you'd need to actually run this.
Setting up your organization
Join the waitlist to get access. Once your admin account exists, an Organization Admin page (in the profile menu) is where roles, integrations, and everything else on this page gets configured.
Assets & custody events
Every physical item or digital evidence record TAMPERLOGS tracks is an Asset. Each transfer, check-in, check-out, or status change writes a Custody Event to that asset's append-only history: who had it, when, where, and why. Custody events are hash-chained, so a broken or edited history is detectable, not silent.
Assets can be scanned in via the browser's camera (no separate app required) or entered by hand from Assets → + Add Asset.
Read the walkthrough transcript
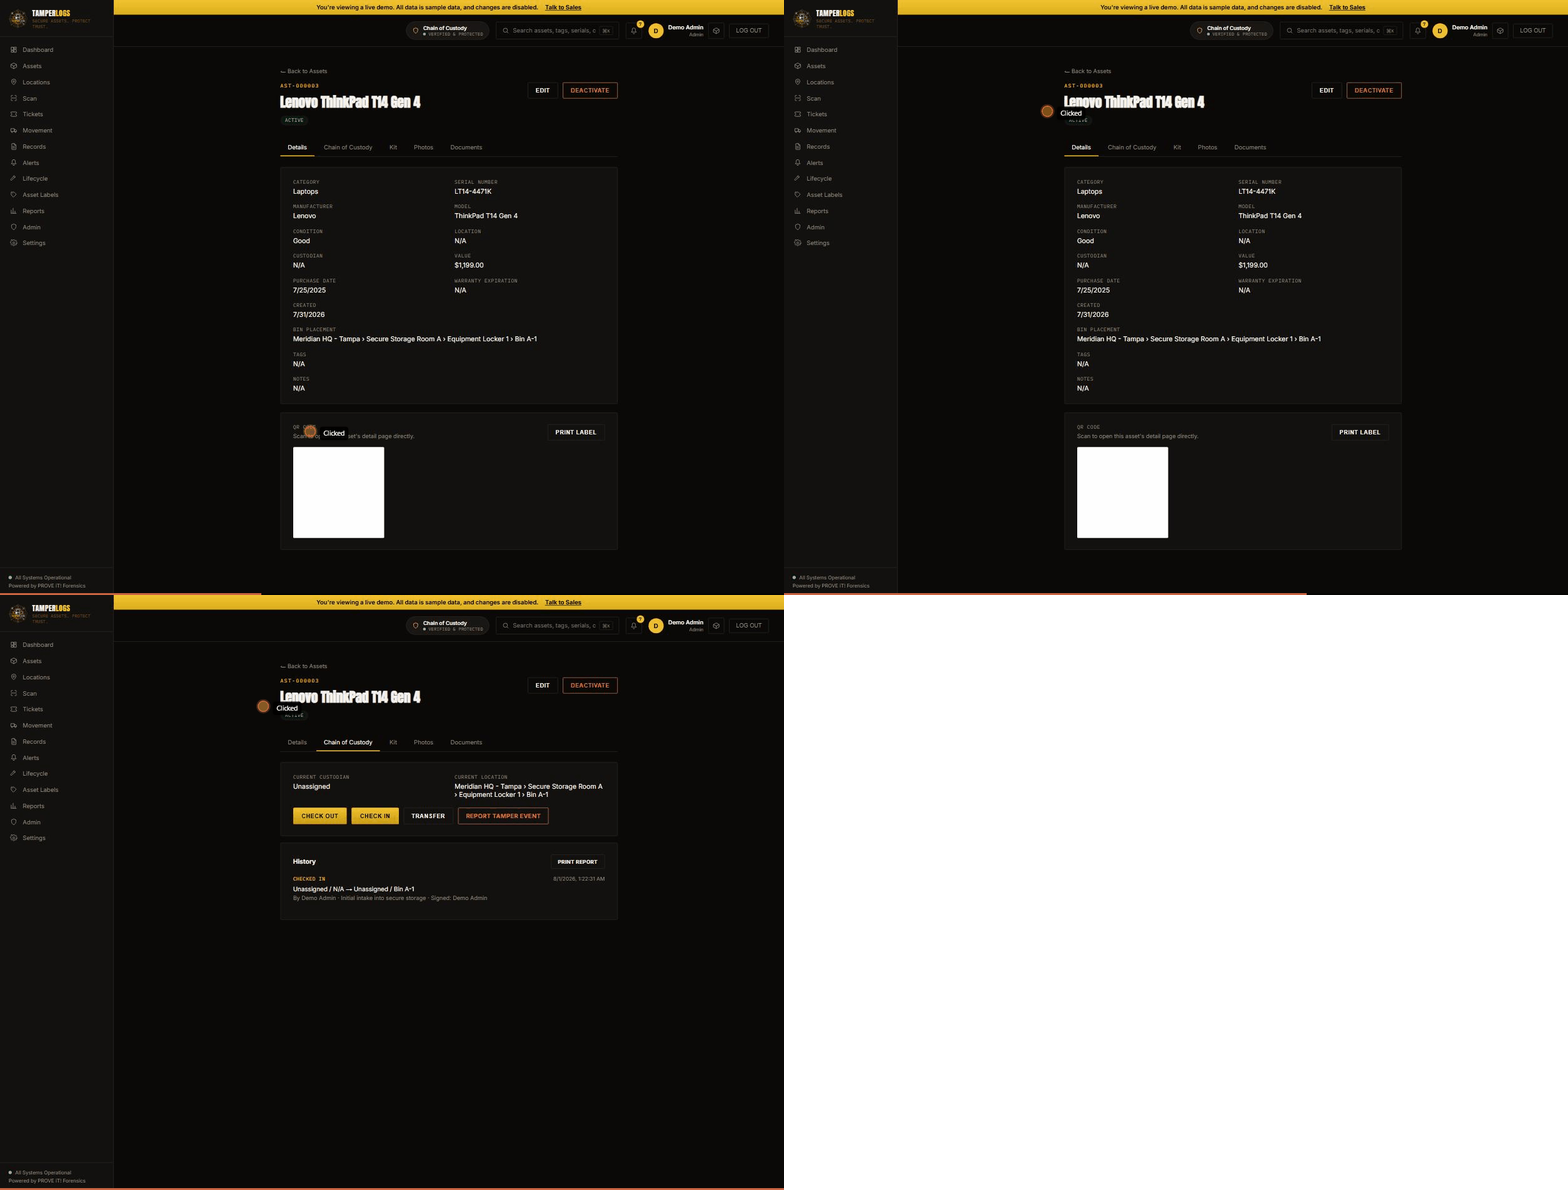
Every physical item or piece of digital evidence TAMPERLOGS tracks starts here, on the Assets page. Each row is one real, registered device: a tag, a manufacturer and model, a status, and who currently has it.
Let's open one. This is a Lenovo ThinkPad. At the top: its current status, condition, and who's holding it right now.
Scroll down to Chain of Custody. This is the part that makes TAMPERLOGS different from a spreadsheet. Every single time this laptop changed hands, got checked into storage, or moved to a different bin, a new entry was written here, and it can only ever be added to, never edited or deleted. Each entry is cryptographically chained to the one before it. If anyone ever tampered with this history, altered a date, or deleted an entry, the chain would break, and that break is detectable.
That's the whole model: assets don't have a "current owner" field you edit by hand. They have a history you can trust.
Connecting an external system
TAMPERLOGS exposes a read-only API for pulling asset and custody data into a system you already run: a dashboard, a data warehouse, an internal report.
- Go to Integrations (admin only) → API Keys → give it a name (e.g. "Internal dashboard") → create.
- The key is shown once, prefixed
tlk_. Save it before closing the dialog. - Send it in an
X-API-Keyheader against the base URL below.
Both endpoints are paginated and scoped to your organization only. Revoke a key any time from the same Integrations page. It stops working immediately.
Read the walkthrough transcript
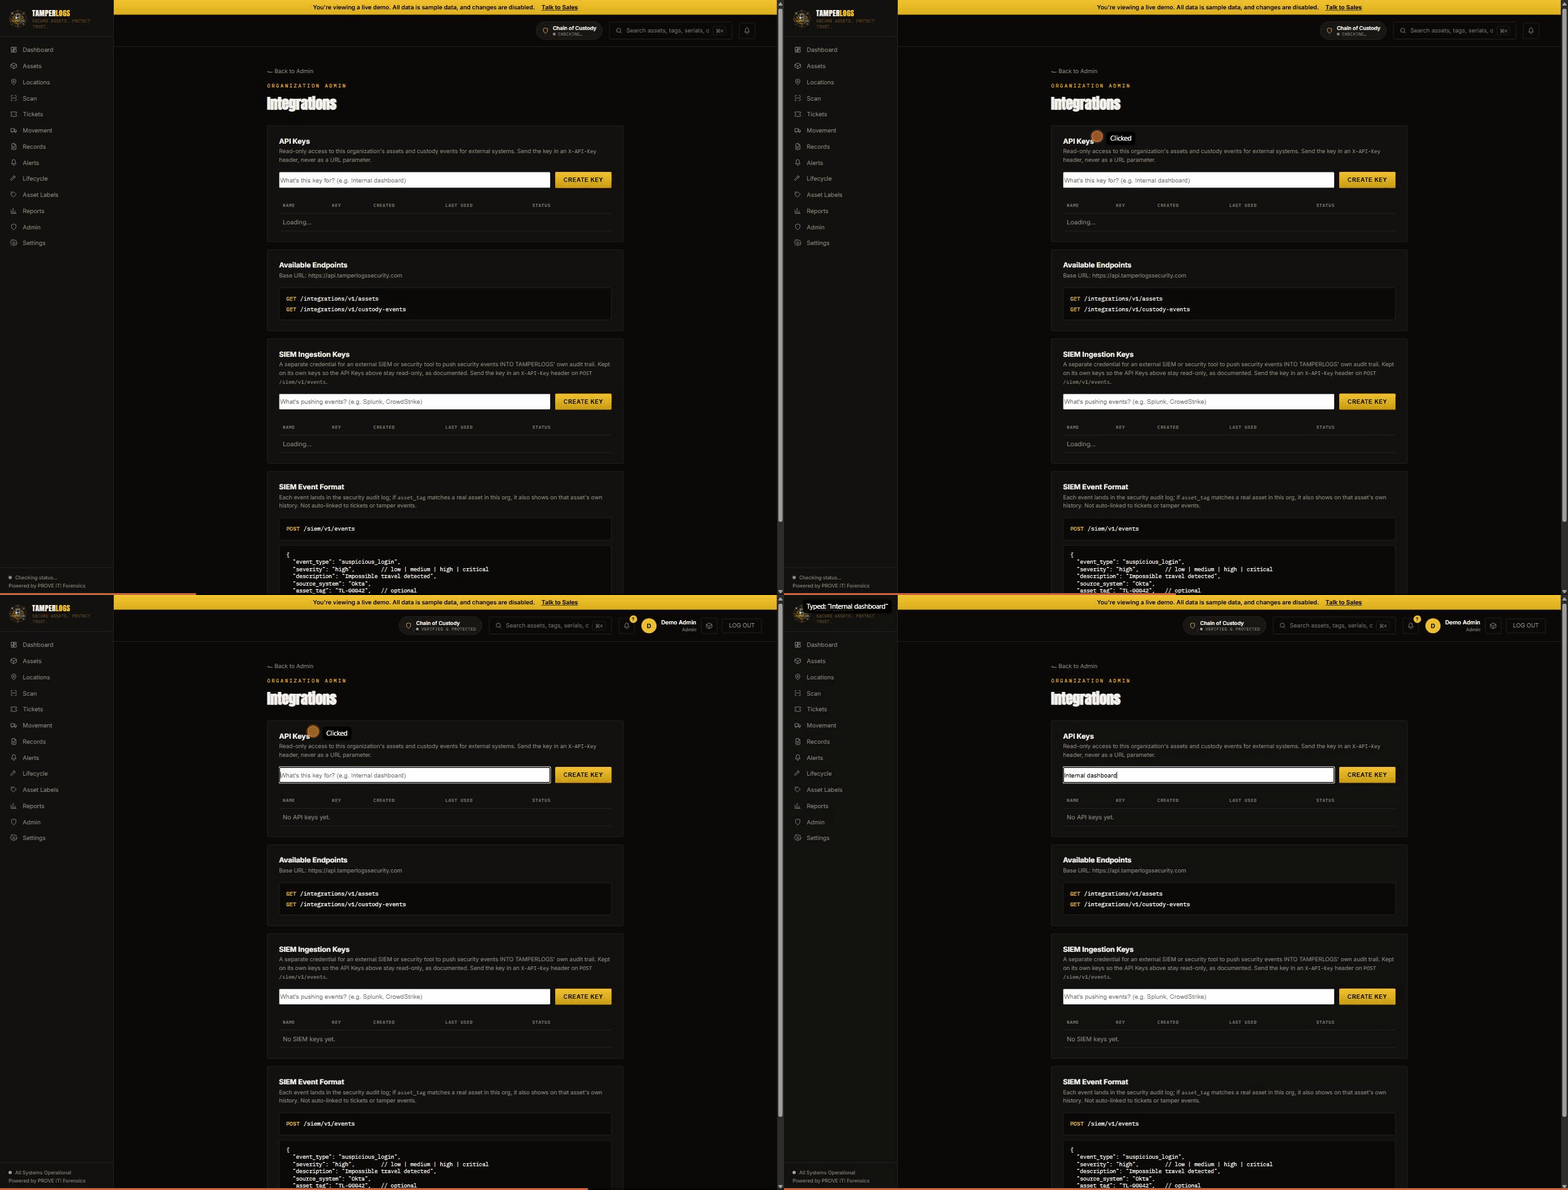
This is the Integrations page, under Organization Admin. If you're pulling asset or custody data into a system you already run (a dashboard, a data warehouse, an internal report), this is where you'd generate an API key for it.
Give the key a name that tells you where it's used later. "Internal dashboard," here, for example.
In your own account, clicking Create shows you the key exactly once, prefixed tlk_. Copy it before you close that dialog. TAMPERLOGS never shows it again. From there, it's one header on two read-only endpoints: your assets, and your custody events, both scoped to your organization only, both paginated. Revoke a key from this same page any time, and it stops working immediately, not on some delay.
Collecting audit logs from Azure AD & Active Directory
Azure AD is cloud-hosted, so TAMPERLOGS pulls from it directly on a schedule. On-prem Active Directory has no cloud API, so a small script you run on a Domain Controller pushes to TAMPERLOGS instead. Both land in the same security audit trail. Configured from Integrations (admin only).
- Azure AD: in Azure Portal, register an app (App registrations → New registration), grant it Microsoft Graph Application permissions
AuditLog.Read.AllandDirectory.Read.All, grant admin consent, then create a client secret. Paste the Tenant ID, Client ID, and Client Secret into the Azure AD Sync card and save. - On-prem Active Directory: create a SIEM Ingestion Key above (any name), paste it into the Active Directory Forwarder card, and download the script. Run it on a Domain Controller as a Scheduled Task every 5-15 minutes.
Read the walkthrough transcript
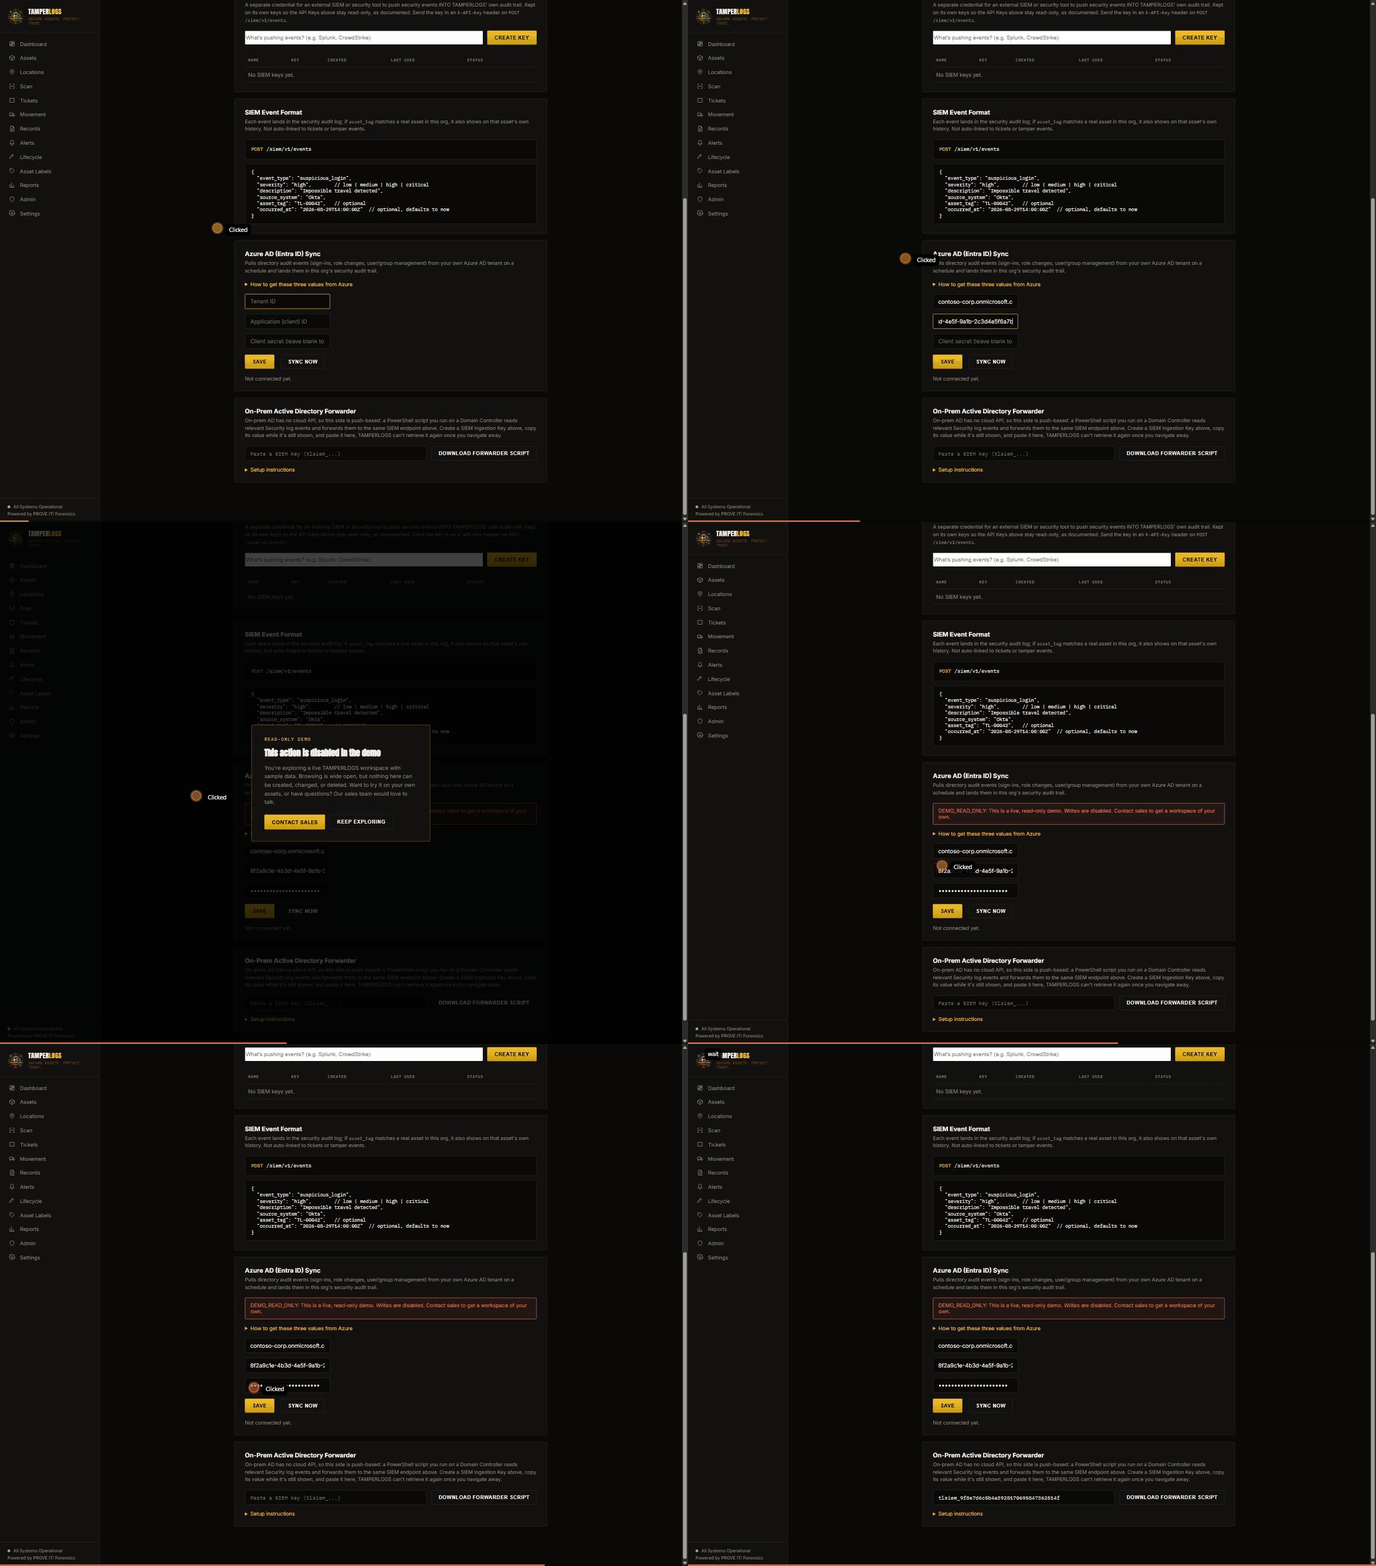
Azure AD and on-prem Active Directory need two different approaches, because Azure AD lives in the cloud and TAMPERLOGS can reach it directly, but an on-prem Domain Controller doesn't have a public address TAMPERLOGS could reach even if it wanted to.
For Azure AD: register an app in your own Azure tenant, grant it two read permissions for audit logs and directory data, and paste the Tenant ID, Client ID, and Client Secret it gives you into this form. From there, TAMPERLOGS checks in on a schedule and pulls in anything new: sign-ins, role changes, user and group management, landed right in your security audit trail alongside everything else. A Sync Now button here triggers one immediately instead of waiting for the next scheduled run.
On-prem Active Directory works the other way around: instead of TAMPERLOGS reaching out, a small script you run on your own Domain Controller reaches out to TAMPERLOGS. Create a SIEM key above, paste it into this box, and download the script. It's a scheduled task on the Domain Controller from there, checking the Security log every few minutes for the kinds of events that actually matter: an account created or deleted, a lockout, someone added to a privileged group. Same destination as Azure AD, same audit trail, just arriving from the other direction.
Setting up single sign-on
TAMPERLOGS supports OIDC-based SSO, configured per organization from Single Sign-On (admin only).
- Toggle Enable single sign-on for this organization.
- Enter a Provider Name (e.g. Okta, Azure AD), your organization's Email Domain (used to route a login attempt to your IdP automatically), Issuer URL, Client ID, and Client Secret. Register TAMPERLOGS as an application in your identity provider first to get these.
- Choose a Default Role for New SSO Logins, applied automatically the first time someone from your domain signs in.
- Save. The page then shows your real Callback URL. Register it in your IdP:
https://api.tamperlogssecurity.com/auth/sso/<your org ID>/callback.
Read the walkthrough transcript
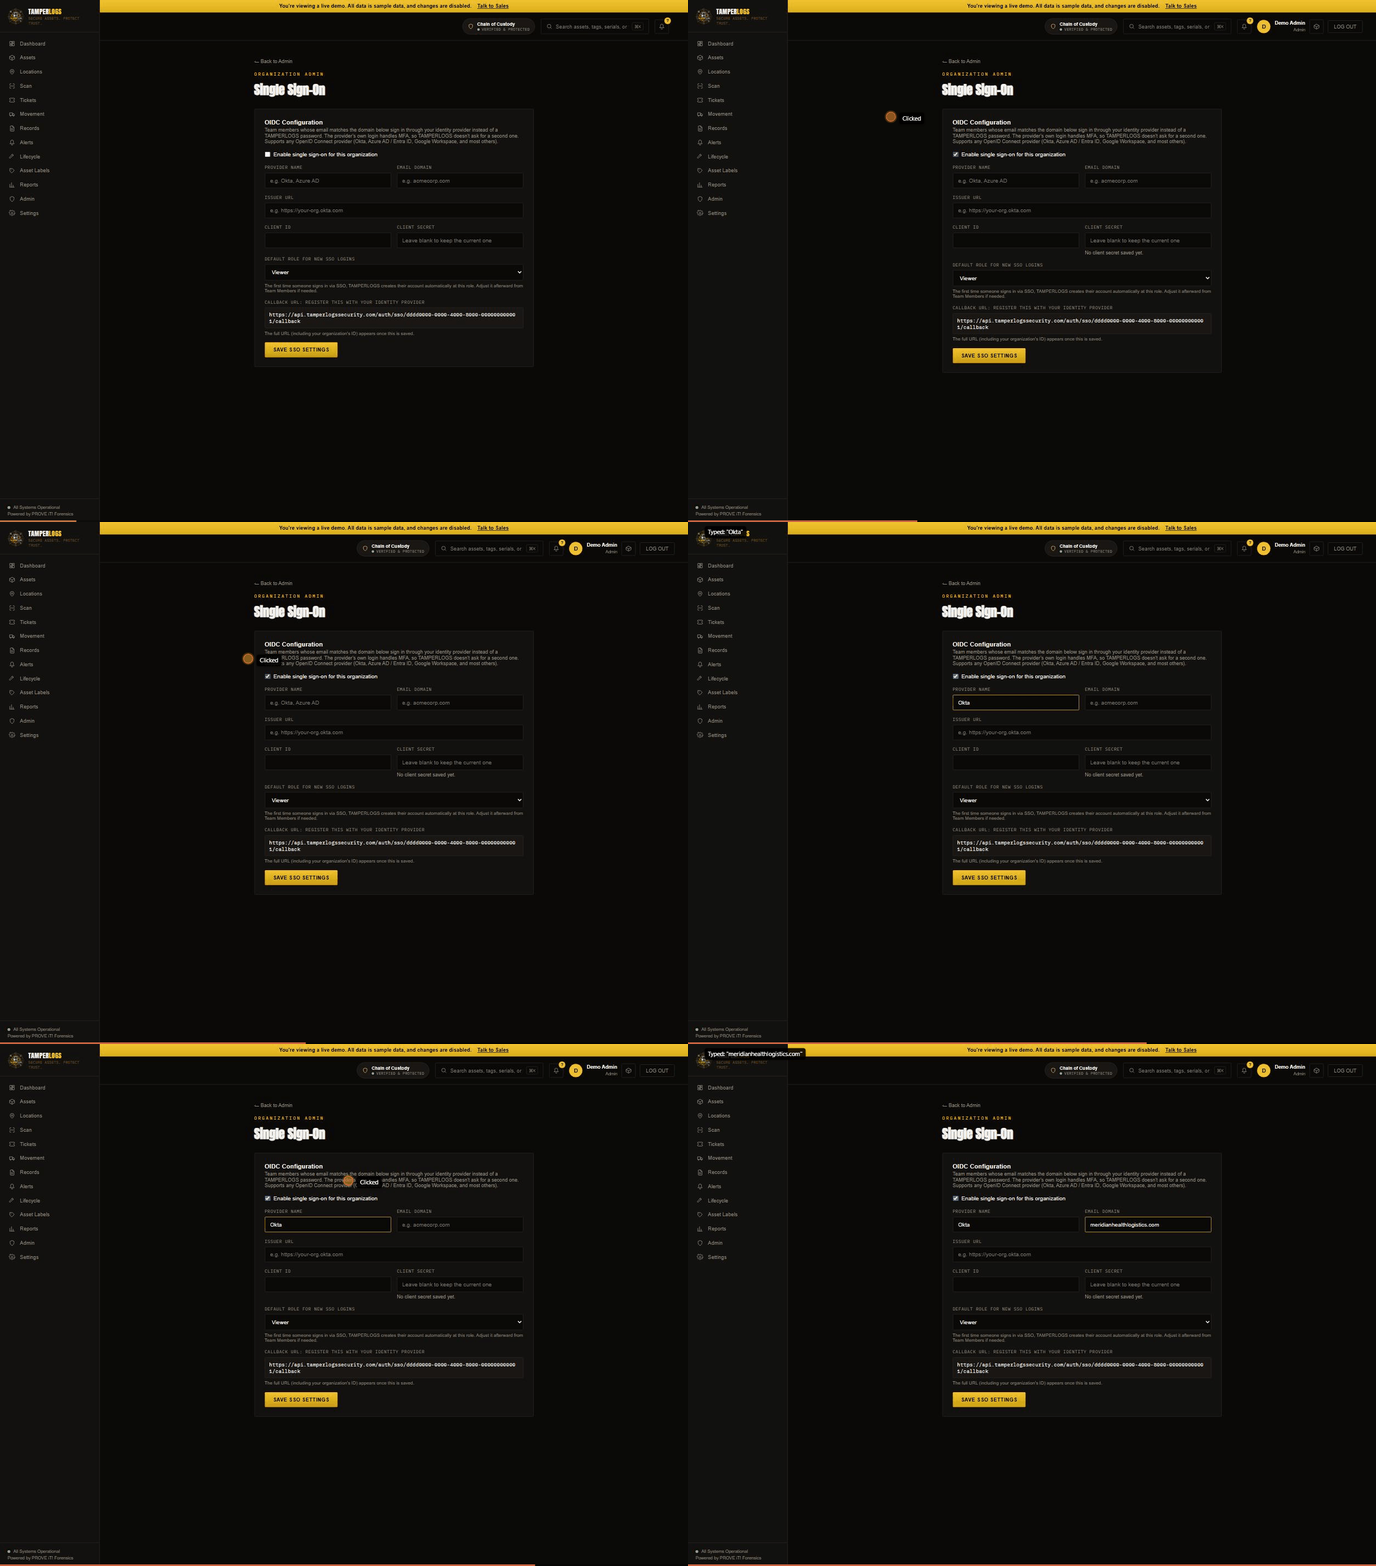
Single Sign-On is configured per organization, from this page: Single Sign-On, under Organization Admin.
Toggle it on. You'll need four things from your identity provider (Okta, Azure AD, whatever you use) after you register TAMPERLOGS there as an application: an Issuer URL, a Client ID, a Client Secret, and you'll set your own organization's email domain here so a login attempt from that domain routes to your IdP automatically instead of asking for a password.
Pick a default role. This is what a brand-new SSO login gets assigned automatically the first time someone from your domain signs in, before anyone manually adjusts their access.
Right here on the page is your callback URL, built from your organization's own ID. That's what you paste back into your identity provider's app configuration to close the loop.
Daily alerts digest
Admins and managers can turn on a daily summary email of anything worth reviewing, from Organization Admin → Alerts Digest. Toggle Send a daily digest when there's something to report. Digests go out automatically at 8:00 AM (America/New_York); a Send Digest Now button on the same page triggers one immediately, useful right after you've turned it on.
Read the walkthrough transcript
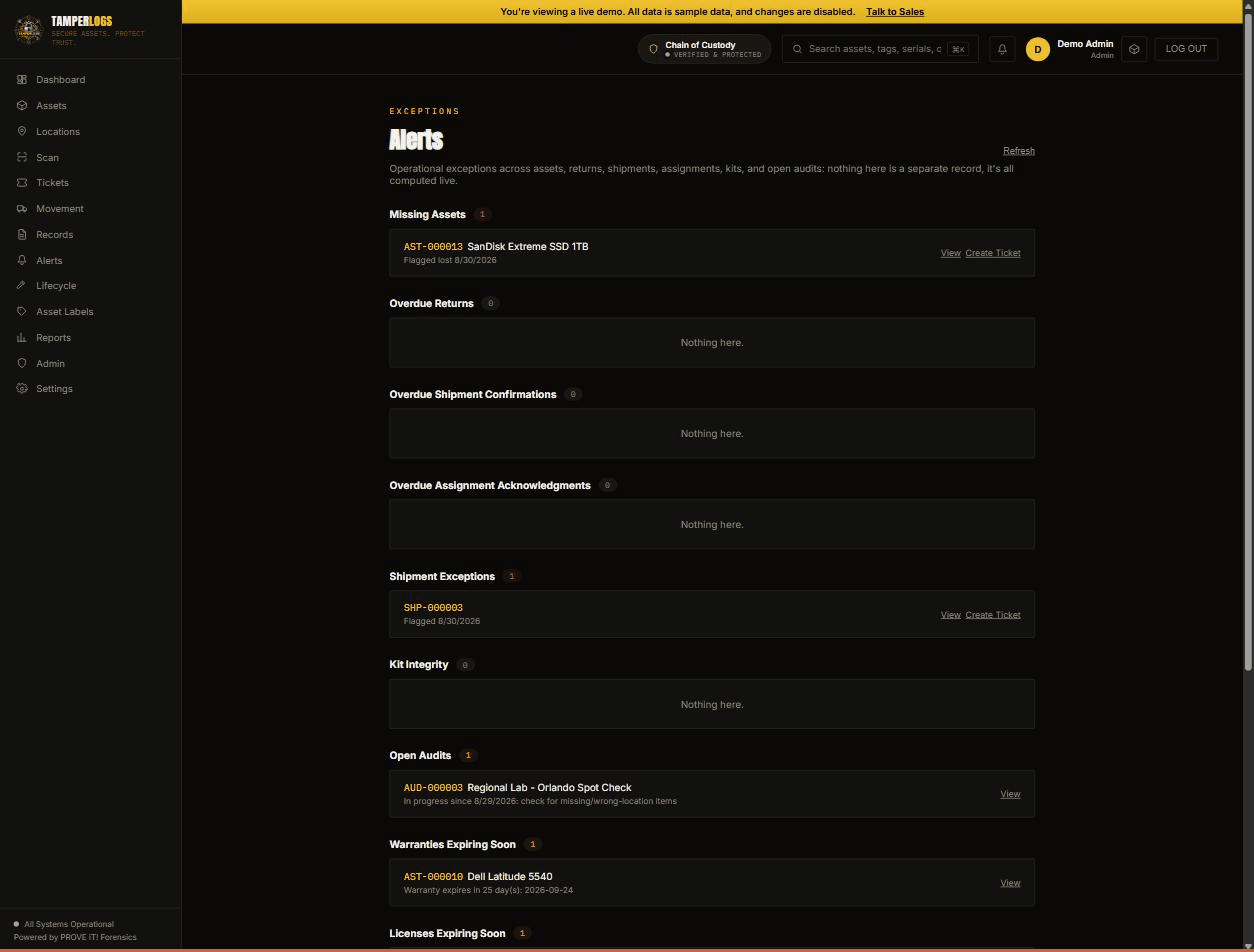
This is the Alerts page, every operational exception across the org, computed live, not a separate record someone has to remember to update.
Missing assets. Shipments that hit an exception in transit. Audits still in progress. Warranties, licenses, and documents expiring soon. Active recall campaigns with equipment still outstanding. Every category here is a real, current count.
You don't have to check this page every morning, though. From Organization Admin, Alerts Digest, turning on the daily summary sends exactly this list to admins and managers automatically at 8 AM, but only on a day there's actually something to report, no empty "all clear" emails cluttering an inbox. There's a Send Digest Now button on that same page too, for testing it or catching something right away instead of waiting for the next morning.
Endpoint Agent
The Windows endpoint agent reports OS-level security events (logons, local account changes, USB insertion, audit-policy tampering) from an enrolled device straight into your organization's audit log. Install it on any Windows device you want to monitor:
- In Endpoints, click Generate enrollment token and copy the single-use token.
- Click Download Agent to download the signed installer (a Windows
.msi). - On the target Windows device, run the installer as an administrator. It registers and starts the TamperLogsAgent service.
- From an administrator command prompt, enroll the device with your token:
TamperLogsAgent-Service.exe enroll <token>
The agent restarts itself after enrolling and immediately begins reporting. The device then appears under Enrolled Devices with a live status dot.
Enrollment is invisible to the person using the device: there is no runtime prompt, because the organization authorizes monitoring of its own equipment when it enrolls. To stop monitoring, revoke the device from Endpoints, which invalidates its credential.
Vendor Directory
Not a connected integration: the Vendor Directory is a simple internal list (repair, disposal, or other vendor contacts) that replaces free-text vendor names on Repairs and Dispositions with a pickable record. Add one from Vendors → + Add Vendor; there's nothing to configure beyond entering contact details.
Read the walkthrough transcript
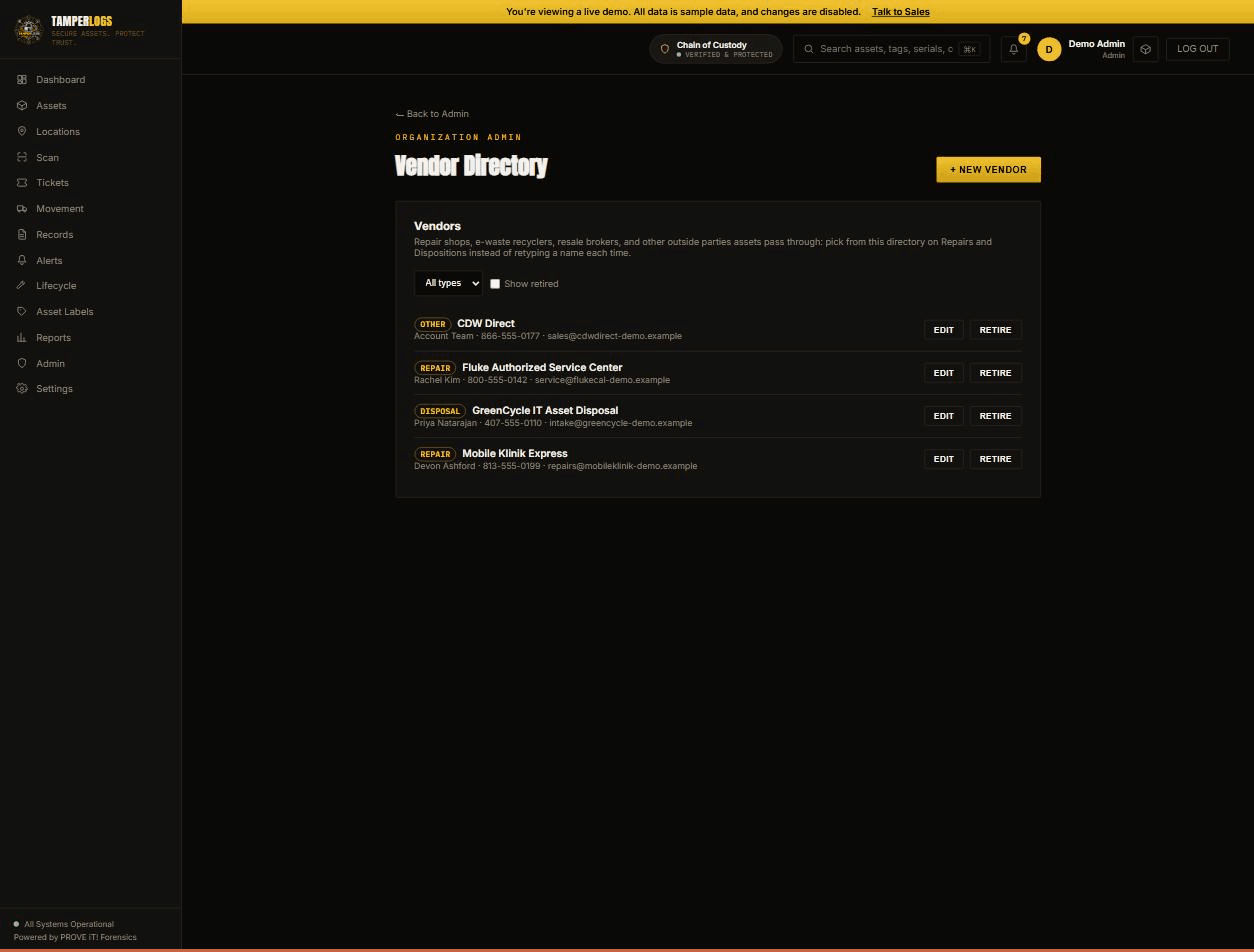
The Vendor Directory isn't a connected integration. It's a simple internal list of the repair shops, disposal companies, and other vendors your org actually works with, so you're not retyping a vendor's name from memory every time you send something out for repair or calibration.
Here's the list, tagged by type: repair, disposal, or other.
When you start a repair or a disposition, instead of typing a vendor's name as plain text, you pick one from this directory, so it's consistent every time and you can see, later, everything that ever went to this specific vendor.
Adding one is just contact details (name, type, phone, email), nothing to configure beyond that.
Dispositions & certificates
When an asset reaches end of life, a Disposition records how it was retired (destroyed, recycled, returned to vendor) and generates a certificate documenting the chain of custody up to that point (the same append-only record every other custody event gets, just closing it out).
Read the walkthrough transcript
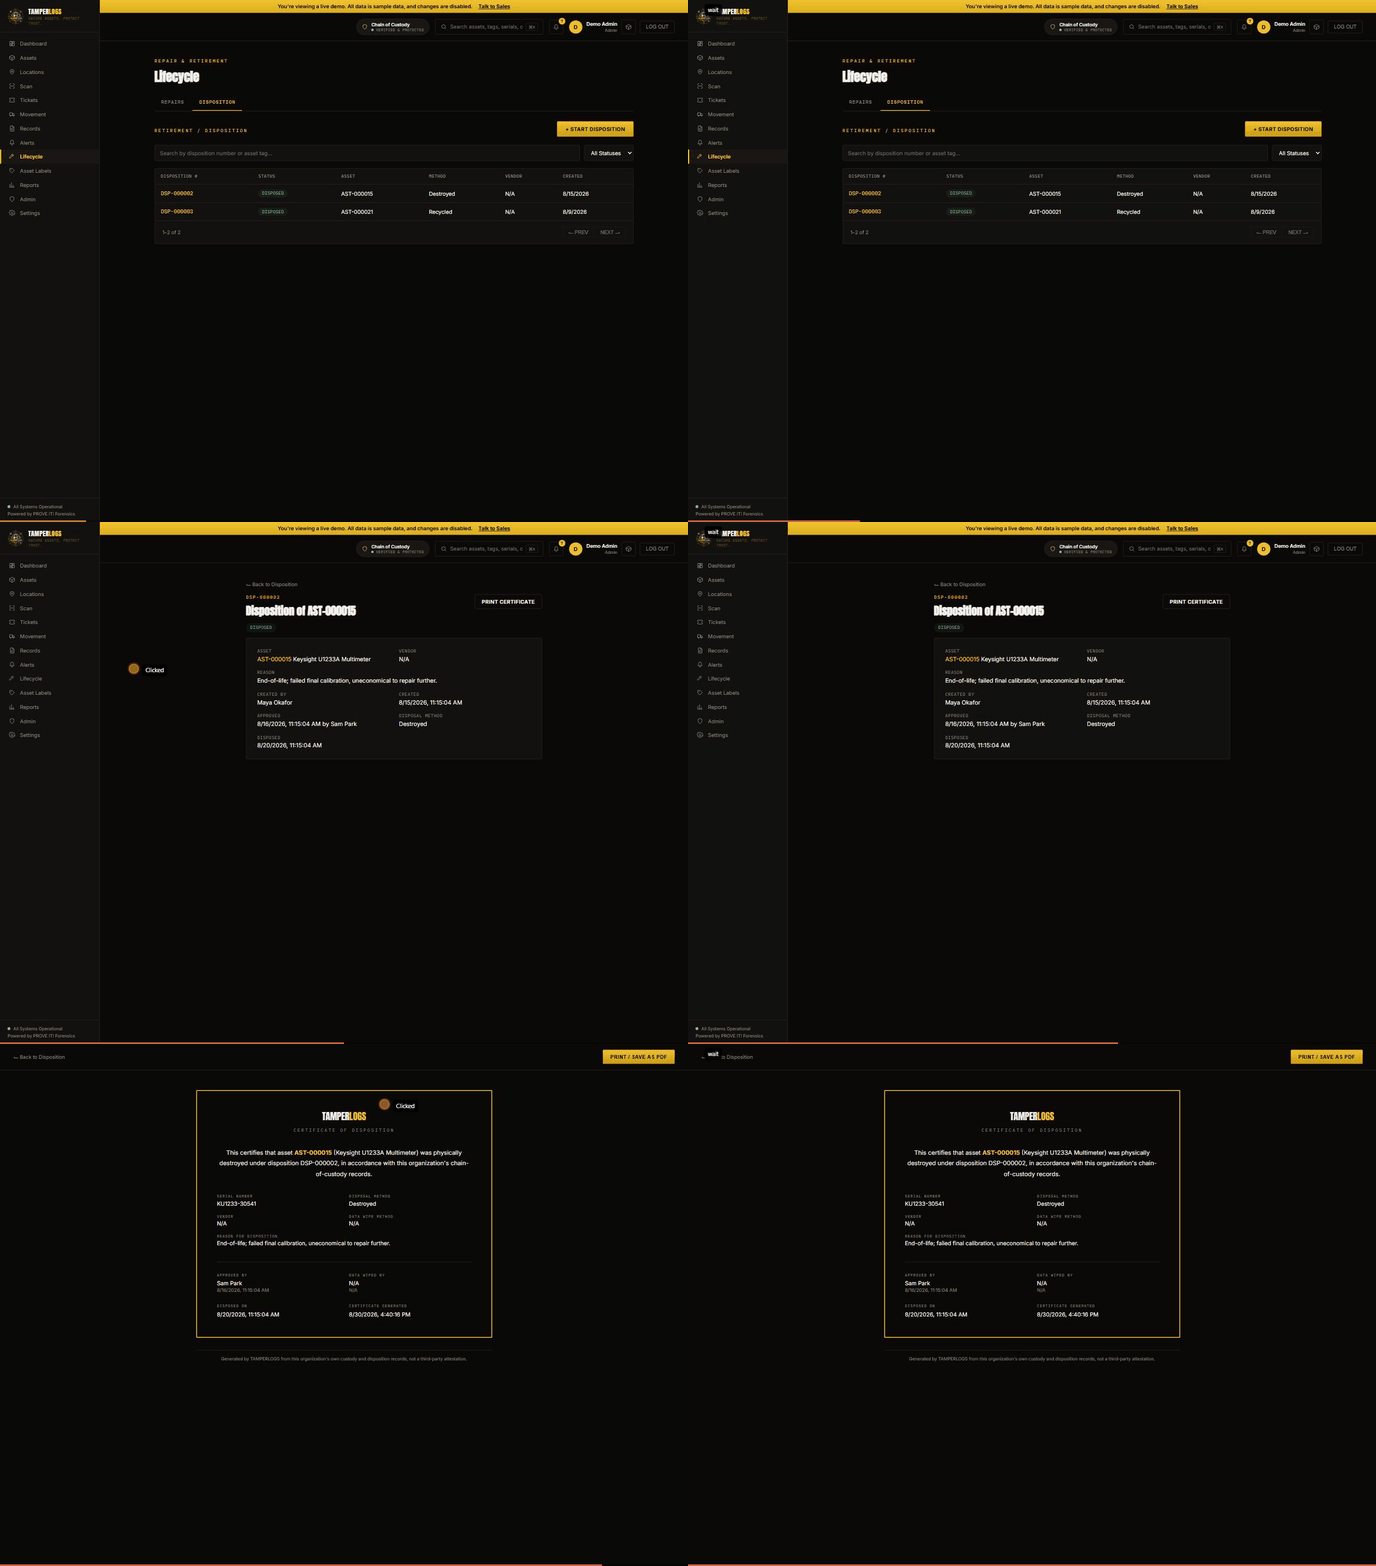
When an asset reaches the end of its life, a Disposition is where that gets recorded, not just deleting the row.
Here's one that's already complete: a multimeter, disposed of after it failed a final calibration check. The reason it was retired, the method (destroyed, in this case, versus recycled, resold, or donated), and the vendor who handled it.
And here's the certificate. This isn't a separate generated document sitting somewhere else. It's a printable view of the disposition record itself, the same append-only history every other custody event gets, just showing the final entry: this asset left the organization's holdings on this date, disposed of this way, by this vendor. That's the paper trail if anyone ever asks what happened to a specific piece of equipment.
Still stuck?
Use the chat bubble on this page for a quick question, or see the Support page for other ways to reach us.